Back to DIY Advice
Essential Guide to DIY Wood Floor Repairs: Fix Common Issues Like a Pro
 Maintaining wood floors is crucial to preserving their beauty, longevity, and value. Regular care not only ensures the floors remain aesthetically pleasing but also prevents minor issues from escalating into major problems. Proper maintenance protects the wood from damage caused by moisture, scratches, and wear, thereby extending the life of the flooring and maintaining the investment in your home.
Engaging in DIY repairs for your wood floors offers numerous benefits. First, it is a cost-effective approach, saving you the expense of hiring professional services. Second, it provides an excellent opportunity to learn new skills and gain a deeper understanding of your flooring. Lastly, timely intervention allows you to address issues promptly, preventing them from worsening and ensuring your floors remain in excellent condition.
Understanding Wood Floor Problems
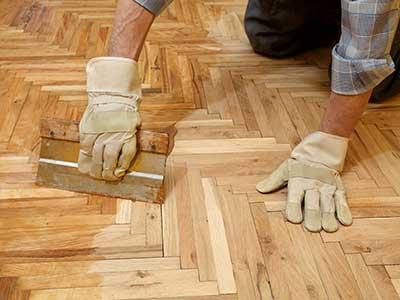
Wood floors, despite their durability and aesthetic appeal, can encounter various issues over time. Understanding the types of wood floors and the common causes of damage is essential for effective maintenance and repair. Wood flooring comes in several varieties, each with its unique characteristics. Solid wood floors are made from a single piece of timber, offering robust durability and the ability to be sanded and refinished multiple times. Engineered wood floors consist of a hardwood top layer bonded to layers of plywood or high-density fiberboard, providing enhanced stability and resistance to moisture.
Parquet flooring features small wood blocks arranged in decorative patterns, adding a unique visual appeal to any space. Several factors can contribute to the wear and damage of wood floors. Moisture is a primary concern, as excessive humidity or water spills can lead to warping, cupping, or mould growth. Scratches and impacts from furniture, pets, and foot traffic can mar the surface, detracting from its appearance. Prolonged exposure to UV rays can cause discolouration and fading, while general wear and tear over time can result in a dull, worn look. Understanding these causes is crucial for implementing preventative measures and timely repairs.
Tools and Materials You’ll Need
 To successfully repair wood floors, having the right tools and materials is important. Here’s a list of essentials and some optional tools that can make the job easier and more effective.
Essential Tools:
- Hammer: For securing loose boards.
- Chisel: For removing damaged wood.
- Putty knife: For applying wood filler.
- Sandpaper: Various grits for smoothing repairs.
- Wood filler: For filling gaps and gouges.
- Stain/finish: To match repaired areas with the rest of the floor.
- Floor buffer/polisher: For polishing and buffing the floor after repairs.
Optional Tools:
- Drum sander: For extensive sanding jobs.
- Edge sander: For sanding edges and corners.
- Nail punch: For countersinking nails.
- Wood glue: For securing loose boards.
Surface Level Damage
Fixing Scratches
- Minor scratches: Start by cleaning the scratched area to remove any dust and debris. Next, use a floor polisher to gently buff out the small scratches. This can help blend the scratch with the rest of the floor. After polishing, apply a touch-up marker that matches your floor colour. These markers are specially designed for wood floors and can effectively cover minor scratches. Let the marker dry and buff the area again if necessary to ensure a seamless blend.
- Deeper scratches: For more substantial scratches, begin by lightly sanding the affected area with fine-grit sandpaper. This will smooth out the rough edges of the scratch. After sanding, clean the area to remove any dust. Apply wood filler to the scratch, making sure to fill it and level it with the surrounding floor surface. Once the filler is dry, sand it smooth to ensure a consistent surface. Finally, apply a stain that matches your floor colour, followed by a protective finish to seal the repair and blend it with the rest of the floor.
Repairing Small Gouges
- Clean the gouge thoroughly: Start by cleaning the gouge to remove any dirt, dust, or debris that may have accumulated inside it. Use a damp cloth or a vacuum cleaner to ensure the gouge is completely clean, as any remaining particles can affect the repair quality.
- Fill with wood filler: Choose a wood filler that matches the colour of your floor. Apply the filler into the gouge using a putty knife, pressing it in to ensure it fills the entire space and is level with the surface of the floor. Be generous with the filler, as it will shrink slightly as it dries.
- Sand smooth: Once the filler is completely dry, sand the area with fine-grit sandpaper to make it smooth and even with the surrounding floor. Take care to sand only the filled area to avoid creating additional scratches on the floor.
- Apply matching stain and finish: After sanding, clean the area again to remove any dust. Apply a stain that matches your floor to the filled area. Use a brush or cloth to blend the stain with the surrounding wood. Once the stain is dry, apply a protective finish to seal the repair and give it a uniform appearance with the rest of the floor. Let the finish dry completely before using the floor to ensure the repair is durable and long-lasting.
Dealing with Gaps Between Floorboards
 Gaps between floorboards are commonly caused by seasonal changes and fluctuations in humidity levels. Wood naturally expands and contracts with changes in temperature and humidity, leading to gaps during dry conditions when the wood contracts. This can be a recurring issue in areas with significant climate variations throughout the year.
Solutions:
-
Using Rope or String Filler for Small Gaps: For small gaps, one effective solution is to use rope or string filler. Begin by selecting a rope or string that matches the colour of your floor and is slightly thicker than the gap. Press the rope or string into the gap, ensuring it fits snugly. This method is non-permanent and allows for the natural expansion and contraction of the wood. It can be easily removed and replaced as needed.
-
Filling Larger Gaps with Wood Filler or Slivers of Wood: For larger gaps, wood filler or slivers of wood are more appropriate. Clean the gap thoroughly to remove any dust and debris. Apply wood filler into the gap using a putty knife, making sure to fill it and level it with the surrounding floor. Once the filler is dry, sand the area smooth and apply a matching stain and finish. Alternatively, for a more permanent solution, cut thin slivers of wood to fit the gap. Glue the slivers into place, ensuring they are flush with the floorboards. Sand the area smooth and finish with a matching stain and sealant to blend the repair with the rest of the floor.
Fixing Loose or Creaking Floorboards
The first step in addressing loose or creaking floorboards is to identify the underlying cause. The problem could be due to loose nails or screws, which cause the boards to shift and creak. Alternatively, the issue might stem from problems with the subfloor, such as insufficient support or gaps between the subfloor and the floorboards. Carefully inspect the area to determine whether the noise originates from loose fasteners or subfloor issues.
Solutions:
-
Re-nail or Screw Down Loose Boards Securely: If loose nails or screws are the cause, the solution is straightforward. Use a hammer or screwdriver to re-secure any loose fasteners. For a more durable fix, consider replacing old nails with screws, as screws provide a more secure hold. Drill pilot holes if necessary to avoid splitting the wood. Ensure that the fasteners are driven in flush with the surface of the floorboards to prevent further movement.
-
Apply Talcum Powder or Powdered Graphite Between Boards: To address creaks caused by friction between floorboards, sprinkle talcum powder or powdered graphite between the boards. These powders act as lubricants, reducing friction and minimizing noise. Simply sprinkle the powder over the gaps and use a brush or cloth to work it into the spaces between the boards. This method can provide a quick and non-invasive solution to squeaky floors, though it may need to be reapplied over time as the powder wears off.
Repairing Water Damage
 Water damage to wood floors is often evident through visible signs such as warping, cupping, or discolouration. Warping occurs when the wood swells and bends due to moisture absorption, while cupping involves the edges of the boards rising higher than the centre. Discoloration may appear as dark spots or stains where water has penetrated the wood. Early detection is important to prevent further deterioration and ensure effective repair.
Solutions:
-
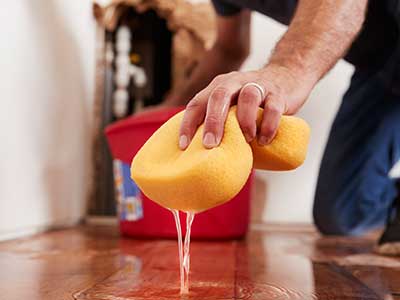
Dry the Area Thoroughly: The first step in repairing water damage is to address the source of moisture and dry the affected area thoroughly. Use fans, dehumidifiers, and heaters to expedite the drying process. Ensure that the area is completely dry before proceeding with any repairs to prevent mould growth and further damage.
-
Sand and Refinish Minor Water Damage: For minor water damage, sanding and refinishing can often restore the floor’s appearance. Start by sanding the affected area with fine-grit sandpaper to remove any surface damage and achieve a smooth finish. Once sanded, clean the area to remove dust and apply a matching stain or finish to blend with the surrounding floor. Allow the finish to dry completely before walking on the floor.
-
Replace Severely Damaged Boards: If the water damage is extensive and the boards are beyond repair, they may need to be replaced. Begin by removing the damaged boards carefully, taking care not to harm the adjacent ones. Measure and cut new boards to fit the space, ensuring they match the existing flooring in colour, grain, and texture. Secure the new boards in place, sand and finish them to blend seamlessly with the rest of the floor. This process may require some skill and precision to achieve a consistent appearance.
Refinishing and Polishing
Refinishing is necessary when your wood floor exhibits signs of extensive wear, such as deep scratches, significant fading, or a dull appearance that cannot be improved with simple cleaning or touch-ups. If the finish has become worn down and the underlying wood is visible or damaged, a full refinish will restore the floor’s appearance and extend its lifespan.
Steps to Refinish:
-
Sand the Entire Floor Using a Drum Sander: Begin the refinishing process by sanding the entire floor to remove the old finish and smooth out any imperfections. Use a drum sander, which is effective for covering large areas quickly. Start with a coarse-grit sandpaper to strip away the old finish, then progressively use finer grits to achieve a smooth, even surface. Pay attention to edges and corners, which may require an edge sander for thorough sanding. After sanding, vacuum the floor thoroughly to remove all dust and debris.
-
Apply Stain if Desired: If you wish to change the colour of your floor or enhance its natural hue, apply a wood stain after sanding. Ensure that the stain is applied evenly using a brush or cloth, following the wood grain to achieve a consistent colour. Test the stain on a small, inconspicuous area first to confirm that it meets your expectations. Allow the stain to dry completely before moving on to the next step.
-
Seal with Polyurethane or Another Finish: To protect the floor and enhance its appearance, apply a protective finish such as polyurethane. This finish creates a durable layer that guards against scratches, spills, and wear. Use a high-quality applicator to spread the finish evenly across the floor. Apply multiple coats as recommended by the product instructions, allowing each coat to dry thoroughly before applying the next. For best results, ensure proper ventilation and follow the manufacturer's guidelines for application and drying times.
Preventive Maintenance Tips
Maintaining your wood floors involves regular cleaning to keep them looking their best and prevent damage. Sweep or vacuum the floor regularly to remove dirt, dust, and debris that can scratch the surface. Use a vacuum with a soft brush attachment or a broom with fine bristles to avoid scratching. For deeper cleaning, use a wood floor cleaner that’s specifically designed for your type of wood. Avoid using excessive water or harsh chemicals, as they can damage the finish and wood fibres. Clean spills promptly with a dry or slightly damp cloth to prevent moisture from penetrating the wood.
To protect your wood floors from damage, implement some simple yet effective preventive measures. Place rugs or mats in high-traffic areas and entryways to capture dirt and moisture before they reach the floor. Ensure that the rugs have non-slip backing to avoid tripping hazards. Use felt pads or furniture coasters under the legs of chairs, tables, and other furniture to prevent scratches and dents caused by moving furniture. Additionally, maintain stable indoor humidity levels using a humidifier or dehumidifier to prevent the wood from expanding or contracting excessively, which can lead to gaps or warping. By taking these preventive steps, you can significantly extend the life and beauty of your wood flooring.
When to Call a Professional
Signs the Damage is Beyond DIY:
While many wood floor repairs can be handled with DIY techniques, some issues are best addressed by a professional. If you notice extensive water damage, such as large areas of warping or buckling that affect the structural integrity of the floor, it’s time to seek professional help. Other signs that may require expert intervention include severe or widespread scratching, deep gouges, and problems that persist despite your repair efforts. Structural issues, such as subfloor damage or foundational problems that impact the wood floor, also necessitate the expertise of a skilled contractor to ensure proper and lasting repairs.
Finding a Reliable Contractor:
When choosing a contractor to repair or refinish your wood floors, it’s important to find someone with proven experience and a good reputation. Start by researching local contractors and reading online reviews to gauge their reliability and quality of work. Ask for recommendations from friends, family, or neighbours who have had similar work done. Additionally, request references from the contractor and check their credentials, including licenses and insurance. A reputable contractor will provide a detailed estimate, explain the repair process, and address any questions or concerns you may have, ensuring that your wood floors are restored to their optimal condition.